A few months ago I posted about a project I was working on whose primary goal was to drive single-pixel drawing on a 16×2 character display. Of course the real goal of the project was just to move forward with electronics, trying new things in both software and hardware.
One of my goals for the 2011/2012 Christmas break was having fun stuff to do with my daughters to cut down on the boredom and minimize slack-jawed TV watching. While planning this out I stumbled across the Wayne and Layne kits, and the Blinky POV kit looked really nice. It looked like a great kit to use to teach my daughter Mary (5) how to solder – it didn’t have too many components, it looked like it would be fun to play with when it’s finished, and I’m really, really intrigued by the “hold it up to the screen” programming method.
Right before I ordered the kit my Mom contacted me and asked for gift ideas for the girls. I immediately suggested this kit for Mary and sent my Mom the link to the project. She said it looked like a great gift for Mary (which I expected) and she also said she really liked the idea of the Tactile Metronome kit (which I did not expect). I couldn’t pass that up, so I bought both kits.
Last March I followed a link to the “Trebuchette” project on Kickstarter – “the snap-together, desktop trebuchet”. I hadn’t used Kickstarter before but the Trebuchette project comtained more than enough awesomeness potential and I backed the project. I had a slight disconnect after the project closed funding because I hadn’t really grasped that there would be a non-trivial delay between funding and shipping. However, the frequent, informative posts from the project owners actual gave me a great deal of pleasure to read as they worked through the realities of building a physical-goods business.
The Trebuchette kits arrived right after Thanksgiving. Since Christmas break was right around the corner I decided to put the kits on a shelf and wait until the second week of break when my daughters would be bored out of their skulls. This plan sort of worked – they did ultimately enjoy them, but I made the mistake of telling them what the kit was when I got it and I had to fend off requests to put them together early every couple of days for a month.
One of the first things I bought to use with my arduino was a 2×16 character display, specifically this one from Adafruit. Playing with it was fine, but after looking at the interface to the LiquidCrystal library I decided to see if I could abuse it by making it into a cheap-o Etch-a-Sketch.
Stage 1 of this project worked fine, and was actually a bit of fun (although it was kind of cheating – I’m supposed to be challenging myself with hardware, and this was really all just programming). I knocked up a couple of trimmers to use as the knobs, whipped up some modulo arithmetic, and I turned my 16×2 character display into a 80×16 pixel display.
Here’s a not-great video of the result:
Next I wanted to make drawing persistent, to be able to actually draw. Seemed simple enough – I had been building custom characters on every update, with the current x,y bit turned on, then writing that char to the correct x,y character position. All I should have to do it maintain an array of characters. Then on each iteration when I set the x,y position, it’s an update, not an entirely new character. Then when I write the character out, I’ll get the entire state for the board.
Unfortunately, this exposed a pretty fundamental misunderstanding I had of the character displays. I assumed that since I was only updating a single “character” at each loop, all the characters I wasn’t touching would just stay put. However, when I re-create the custom character at each loop, that also updates every place on the display that was showing that “character”. It actually looks fairly interesting as, over time, multiple characters on the screen start to come to life and start changing in sympathy with each other. Cool, but not at all what I wanted.
This failure completely makes sense as I think about it. Since the LiquidCrystal library only supports 8 unique custom characters I can’t make use of the whole screen just through the standard library. It’s possible that the 8 character limitation is arbitrary and that I could raise it by mucking around in the library, but that doesn’t sound like that much fun.
There are a couple of possible next steps I could take here:
Just to show the core of what I wanted to do, use the 8 custom characters I get from the LiquidCrystal library to make a 2×4 character (16×20 pixel) display. I will probably do this and take a video of it just to have done it. One of the original goals in this project was to just make anything that I wasn’t copying from someone else. Ideas include a write/erase function, “status” lights, an “invert” button, a non-state-changing cursor, basically anything to take up a pin on the Arduino. Now that I write this down and remember what my goal was, I’ll probably do this no matter what
I could track down the LiquidCrystal library and understand what the root of the 8-custom-character limit is. If it’s an arbitrary software limit, maybe raise it and recompile. If it’s not arbitrary but due to memory, maybe make a custom version of the library in which some standard characters are missing, allowing me to use their memory space for more custom chars. I doubt I do this anytime soon, but if I decide to play around more with Arduino libraries, this might be a fun platform to learn more about them.
If the limit on the number of custom characters turned out (somehow) to be hardware based, then I could skip the LiquidCrystal library altogether and see if I could somehow force the hardware to do what I want if I give up on the need for standard characters. I think the only way I would do this is if I actively needed to learn about the LCD chipset’s low level use for some other reason.
There’s a strong possibility that I may bag everything above because I had an idea for a new project that I want to get working using my Arduino. Since this is the most interesting thing I’ve made that I haven’t copied form someone else, I should take this opportunity to think about how I will store project information. I’m not fond of the Arduino dev environment’s file system layout requirements and concessions I have to make to it to use SVN, but I do have this sketch in SVN. Need to lean more about creating and storing schematics. Can I store them with the Arduino sketch without the Arduino software complaining? What’s the best software to use? Right now I just want to sketch something out that I can use to recreate the circuit later, and that I can put in version control. ASCII art would work right now, but I wonder if there’s an advantage to finding more specific software this early in my learning cycle…
Right. Disappointed that my original idea didn’t work, but still plenty to learn in that list above. I wonder if I can get 1 and 4 done while waiting for parts for NewProjectIdea?
Last winter something broke one of my favorite bird feeders. I kept it, and in the spring smashed it up and made a mosaic of a bird with it. I knew when I made it that it wouldn’t last outside. I made no special effort to research materials, I just enjoyed smacking the thing with a hammer and gluing the pieces on a board.
I hung it from a tree in our yard and enjoyed it all summer. When I noticed a couple of pieces falling off, I took it down, scraped the tile and glue off and threw the board back in the scrap pile. A low effort, high enjoyment project.
I didn't take any pictures that I can find before I hung it up, but this is what it looked like
A month or so ago I was hanging out in the garage with my daughters goofing off. I have this collection of coffee cans I can’t bring myself to get rid of, and for some reason I decided to draw a jack-o-lantern face on one. It turned out pretty well, so that evening I cut out the face with a dremel.
Looking Sharp...
No, the zippo's not upside down, the picture is.
After that I forgot about it for a while and it seemed like its only reason for existing would be to make me happy I had dug out my zippo a few days earlier. But then I stumbled across a post about pumpkins and LEDs. Perfect! I took advantage of my wife’s spray paint habit (that is, she likes to spray paint stuff, not huff it) and dug up a can conveniently named “Pumpkin Orange”. Hrmm. I suppose it might be made to work.
I had a couple of missteps (my original attempt at highlighting the cuts did not go well), but I got the can fairly well done up.
Ugh. Starting to be able to see that mistake I made in his left eyebrow...
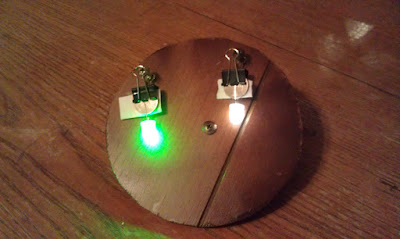
After a quick “throw in” test and experimenting with different colors, I decided to use a green LED for highlighting the shape and a flickering LED for ambience. I cut a lid out of some old paneling then rigged up the LEDs to it with some screws and binder clips.
Better men than I have failed to take a good picture of a lit LED
Throw the lid on and see how it looks.
The dowel evokes a stem, yes?
Oof. That left eyebrow is looking worse and worse.
And finally a video. This whole project really hinges on the flickering “candle” LED, it plus the green LED together make it look really good in person
All in all this was a really satisfying, relatively quick project. My daughters loved it. I think I’m going to give them each an appropriately sized piece of paper and let them each draw something I’ll cut out and they can customize (paint, choose lid, LED color, etc). It also seems to have passed my wife’s crafting muster which is nice.
One unexpected thing – this has been sitting on my kitchen table for the last 24 hours or so, and it keeps catching my eye, even in daylight. I think I’ve been so conditioned to not leaving candles or other exposed flame going that the flickering is catching my subconscious.
It’s 8 LEDs and a pot, with the position of the pot controlling how many of the LEDs are lit. This is not a complex project, but I like it very much because it’s the first thing I put together that was not just copied from a tutorial. The shift register/8 LEDs was from one project, but I figured out how to add a pot to the circuit, read the pot position off of an analog pin, and set the LEDs accordingly. I am very proud of my silly little circuit.
I just spent all day today elbow deep in water trying to fix a copper line I broke while trying to change out a toilet in the basement. This project started when I suggested that I should build some shelves in the basement for storage. It made sense at the time…